Beeline Moto 2: User Review and Performance Comparison

What is Beeline?
TL;DR It’s a remote display for your phone. Your phone is safely stowed out of harm & vibration’s way, while the Beeline Moto 2 provides a discreet display mounted on your handlebar.
We sometimes use affiliate links in our content. This won’t cost you anything extra, but if you purchase something from one of the links, we may earn some money for coffee. As an Amazon Associate, I earn from qualifying purchases.
I have been a long-term user of the Beeline Moto. Every coffee ride on the site is done with a Beeline Moto in compass mode. I was so reliant on the Beeline that when one of the buttons started to fail on my original plastic unit, I ordered a metal one so I wouldn’t be without a Beeline while the other was being repaired.
I loved the original Moto’s simplicity and size. Due to its small size, the design works with any bike. The battery life was insane. I could go for a few days of full riding without charging.
But it wasn’t perfect. If you were using turn-by-turn and had rapid turns right after one another, the display of just the next turn could make you miss them. While this was addressed somewhat with the voice-over instructions from Beeline Plus, a visual indication is better. Another issue is if you have a turn coming up in a congested area and there are a few streets next to one another, knowing which one was the one you needed was a bit of gauging the distance vs what was indicated on the Beeline & hoping your phone’s GPS was accurate enough. Finally, the buttons being on the outside of the unit and potentially close to other elements on the bike were prone to failure. I had two units fail, but Beeline was great about replacing them, so I love their customer service.
When the Moto 2 was announced earlier this year on Kickstarter, I was an early backer. I ordered the metal version because I liked the original one so much. However, it did mean I would be in the later batch of shipping.
I was hoping it would arrive in time for me to use on the Ramapo 500, so when it arrived the second week of July, I had just a few days to spare to get the new mounts installed on the bikes before the trip.
First Impressions
The new unit has a more robust appearance, with the crown bezel rising above the screen than the previous generation unit. Compass markers on the bezel itself provide visual references for directions. The LED indicators at the top of the unit are bright and can be attention-getting for your next turn if you don’t have the audio directions provided by Beeline Plus.
Gone is the proprietary charging mount, which used the same mounting ears as putting it on the bike. If you forgot the original charge mount at home on a trip, you were out of luck. Now, it uses standard USB-C. I don’t know how waterproof the port may end up being in the long run, but for the convenience of charging, it’s a huge step up.
Turning on the screen to begin the pairing process, it’s remarkable how much brighter it is than the older generation.
Installing the Mounts
Bar Clamp Mount
I had 2 bar mounts for the original Moto, one for the R18 and the other for the GS. While these are nice solid pieces the original design did have some downsides. The original had 2 screws to secure the mount around the bar from the back side. In some installations, with limited access below the bar for a tool, you needed to keep the clamp slightly loose to rotate into position. Additionally the width of the clamp itself both on the base that supports the Moto and the clamp around the bar that it was hard to mount in some places.
The new clamp addresses both of those issues. The clamp itself now features a pivot in the middle so only one side is loosened. The screw to hold it in place is now on the top. However, it is only accessible once you remove the plastic insert for the Moto 2. Now with access to the screw, you can get it in place.
Also, the clamp thickness is smaller than before so is easier to mount close to the main handlebar clamps.
Moto 1 Adapter
I originally got the adapter to use with my mirror mount I use on the Vespa. Upon disaseembling that mount, I found that the nut had stripped that held the mount plastic in place, so it wasn’t going to be an option. I did have one of the older raised plastic mounts on one of the bikes that I tried to use the adapter on. However, with the increased retaining force of the new Moto 2, the adaptor would rotate in place in the mount. Stick to using the adapter for just the bar mount & mirror mount.
Physical comparisons to the original Moto
Size
The original plastic Moto was 49.8mm in diameter, 18.6mm deep and weighed 30 grams. The new Moto 2 is 53mm in diameter and 20.5mm deep weighing 42g. It’s only 8% larger diameter. The weight is still so low as to be irrelevant.
Battery
The original Moto had a 400mAh battery which had a claimed battery life of 10 hours with backlight and 20 hours of blended use. Standby time was 4-6 months. The pogo pin charger had a USB-A plug.
The new Moto 2 has a 600mAh battery with a claimed battery life of up to 14 hours and standby time of up to 12 months. So, slightly down from the 20 hours of blended battery life on the original Moto, but reasonable for most any day of riding. It now uses a standard USB-C plug for normal charging, but the pogo pins are available for use with the optional powered mount to charge while on the bike.
Display
The original Moto had a memory in pixel transflective LCD with backlight with a resolution of 208x208 and an active screen diameter of 26mm. It would have an almost bluish tint with the backlight on.
The new Moto 2 has IPS TFT with anti-reflective and hydrophobic coating with a resolution of 412x412 and an active screen diameter of 37mm. 40% larger diameter screen than the original, but the whole unit is only 8% wider from the much smaller bezel.
Sensors
While the original had an accelerometer, gyroscope and magnetometer, the new Moto 2 keeps those and adds an ambient light sensor. No longer would you have to manually turn on the backlight or use a clock based automatic approach. It will enable the backlight as needed.
Device Interface
The biggest improvement on the Moto 2 is the interface, so we’ll spend much of the review discussing this.
Modes
The Beeline Moto 2 supports three modes of use. The best way to think of it is that it is a remote display for your phone. The Beeline app on your phone is all the brains. When going on a ride, you can choose from three modes in the app.
Compass
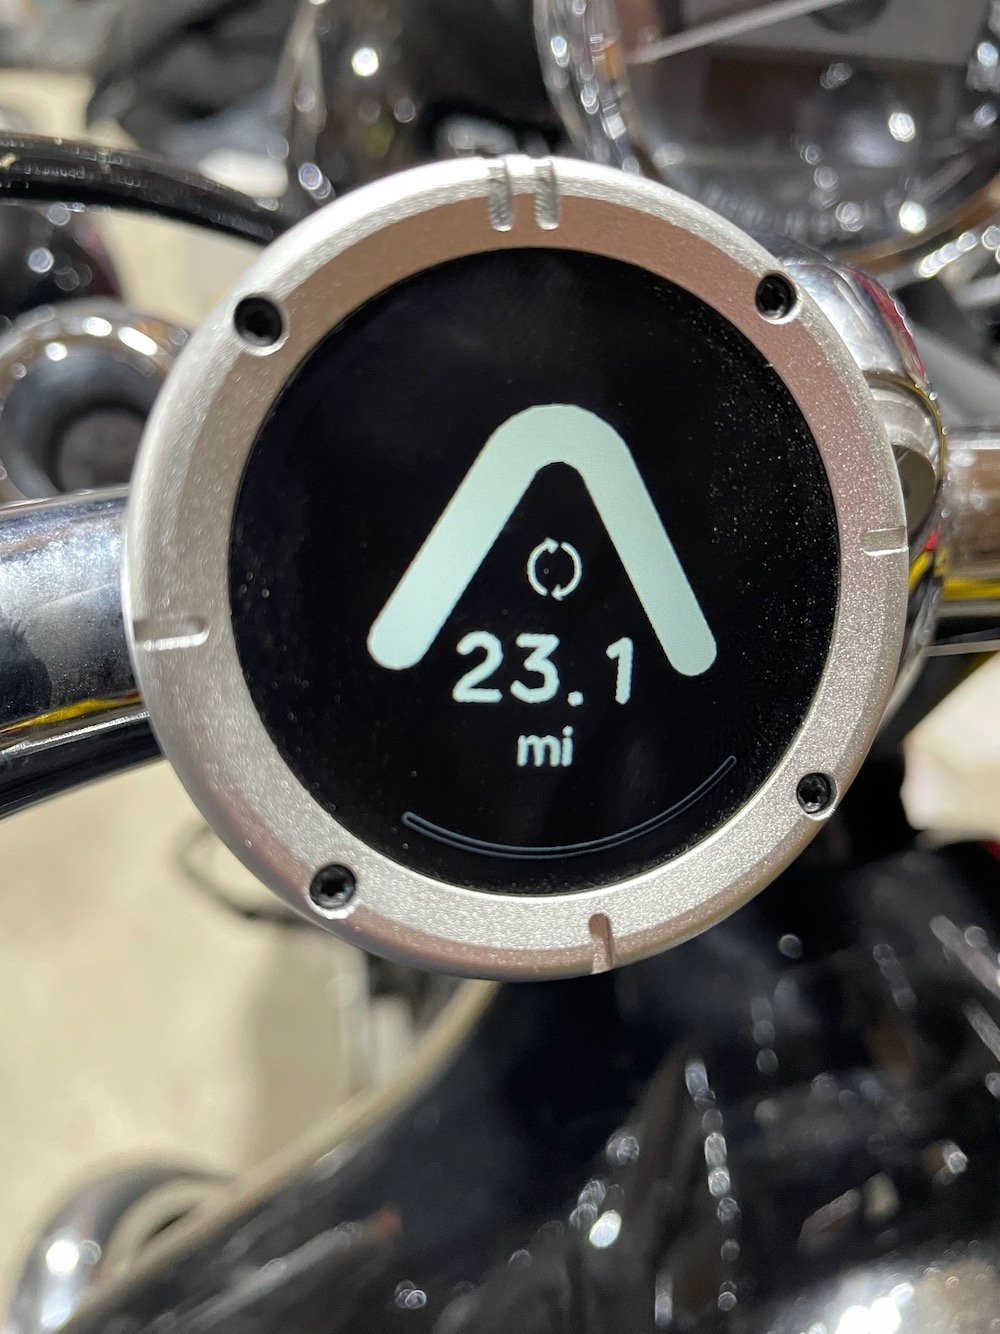
Compass mode on the Beeline Moto 2 looks similar to the original
Compass mode returns in the Moto 2. You set your destination and any middle waypoints in the app and then select Compass as your routing choice. On the device, this simple display is an arrow pointing to your destination with a distance remaining indication. I love this mode & it’s how all the coffee rides on the site are done. You look for roads that head roughly in the direction of your destination. If the road you are on no longer matches the compass heading, you need to make a turn. While it can seem like a difficult approach, I’ve found it is an amazing way to find roads you probably would miss with a direct route. See our article on discovering new roads with Beeline.
Turn by turn
You start in the same way as compass mode in the app, selecting your destination and any waypoints. The app will usually provide a couple of route options, a fast one and a fun one. The fun one takes advantage of some crowd-sourced road ratings and a look at the curviness of roads to find that epic route.
On the device, the Moto 2 features a user-friendly interface for the turn by turn mode.The main difference from compass mode is the distance indication, which now shows the distance to the next turn. A small round dot indicates the direction of the next turn, making it easy to follow your route.
Unlike the original Moto, the Moto 2 now has a mini-map that shows a simplified view of where you are and the intended path fully filled with white. Roads that branch off your intended route are indicated with outlines. It is a very simple yet effective way to give more context without much screen real estate.
Recording
Like the original Moto, this is started on your phone by hitting record. Your app will record your route and statistics. On the device, you can see an indication of elapsed distance and time.
Junction Improvements
The most obvious change from the original Moto is the ability to see junctions in a simplified moving map. This is made possible by the greater resolution and size of the new display. In practice, this works very well. It will display roads that you’ll be going by even if they aren’t the ones for you to take, similar to a full map-based GPS like the Garmin Zumo XT. But it eliminates much of the excess information and provides a clear view of where to turn. Additionally, this can also show turns immediately following it visually, so you are prepared for a quick right followed by a left ahead of time.
Two other features on the new Moto 2 aid in junctions. With the original Moto, if you didn’t have Beeline Plus’s audio directions and weren’t constantly looking at the device, you could easily miss a turn. The new Moto 2 has a bright flashing pair of LEDs at the top of the screen to get your attention. Additionally, the device emits a beep. If you don’t have Beeline Plus, this can be a welcome improvement over the original.
Situational Awareness
While the junction improvements alone would be a great step up from the original Beeline Moto, the new interface has additional benefits. The original device’s arrow would indicate the bends in the road as soon as you were on them, but you had no real awareness ahead of time.
In the new Beeline Moto 2, the same display that benefits you at junctions gives you more context of the road’s curves. You will see a dog leg turn ahead, so it doesn’t surprise you. The same indications of other roads are shown on the map, so you know an intersection is coming up that could have a car jump out in front of you. Much of the contextual benefits of a full map-based GPS like the Garmin Zumo XT are now in the Beeline Moto 2. In some ways, this simplified interface is even better. It’s just enough information to give you the context you need while riding, but not so much that your eyes always look at the screen instead of the road.
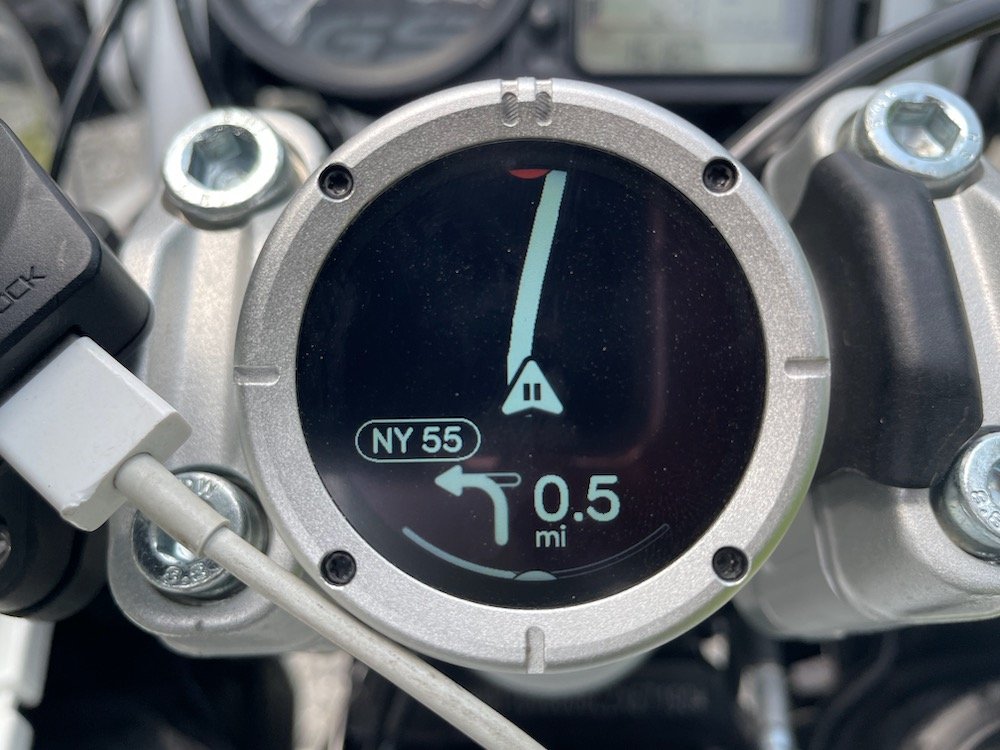
Numbered routes are shown to enhance awareness
If you are using a route generated by the Beeline App, if your next turn is a numbered route, this will be displayed onscreen to give an additional indication as to what your turn will be. While the audio instructions from Beeline Plus also say this, the on-screen indication that stays on can help when looking at road signs indicating the upcoming junction to reinforce where your turn is.
Additional Improvements
The Beeline Moto 2 has four buttons, just like the original Moto. However, rather than being on the sides of the device, these pivot the bezel. It’s much easier to manipulate them with gloves than the original Moto. These buttons allow you to access additional screens besides the main direction screen.
Journey Time & Distance Screen
The original Moto had a screen that would display the elapsed time & distance since you began the journey. While this is helpful, it did not indicate of remaining time to your destination. Your app still knew the estimated time for turn by turn routing, but there was no way to see this on the device.
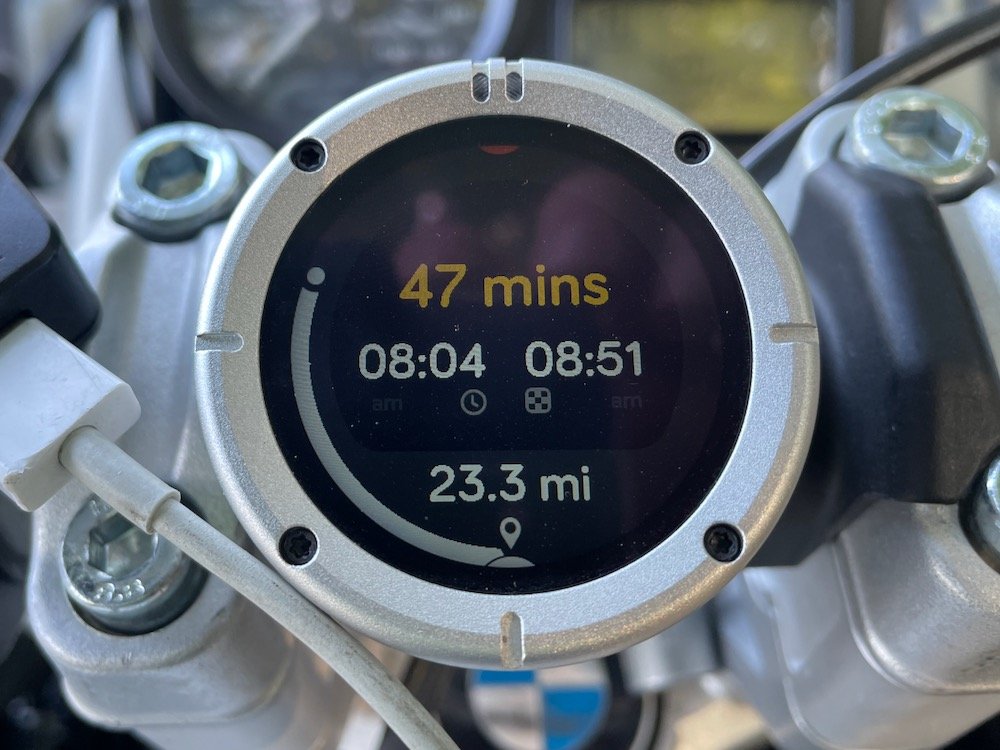
How much longer till I arrive, and what is my ETA?
On the Moto 2, this now includes a much-requested feature of displaying time and distance remaining. This is great for when you’ve been on the road for a while & you’re feeling a bit in need of a break. Looking at this screen can let you know you only have 10 minutes instead of another hour to your destination which may be the difference between pulling over to the side of the road for a break or continuing.
Speed Screen
Most everyone knows that motorcycle speedometers often underestimate your speed. The original Moto had a screen to see your current speed as measured by the GPS on your phone. This is a helpful tool to check your bike’s speedometer vs reality.
During rides where I didn’t need the GPS for directions or even a compass, I found the recording feature in the app quite handy. I could simply turn it on and view the speedometer screen on my device.
On the Moto 2, this screen returns, but with an added feature… speed limit. The screen will show the speed limit of the road you are currently on. Once you’ve exceeded the speed, the limit will have a red treatment and a small indicator of how far over the limit you are. Very helpful when you are just recording a ride.
But it’s not only on the speedometer screen. The speed limit can be optionally shown on the main routing screen with a similar treatment if you exceed it.
Skip Waypoints
If you have a route with multiple waypoints, you can skip a waypoint directly on the device. A long push of the top button allows you to skip the next waypoint. If you don’t have any waypoints between you and the destination, it ends the ride.
Real-world test
The Ramapo 500 event, which I used as my break-in test for the Beeline Moto 2, allowed me to exercise both imported GPX files and in-app turn-by-turn routes. The Ramapo 500 is a two-day event covering ~500 miles. Put on by the Ramapo Motorcycle Club each year but open to the general public, it promises some excellent roads each day of the ride with camping in the middle. In keeping with the Beeline Moto 2’s simplicity, I rode my BMW R18 Classic and used my Wingman of the Road Toucan Tent.
It was a rainy start to my day, with a fast-moving front promising rain for the first few hours. From home, I pointed the app to the sign-in point for the Ramapo 500 in Congers, NY, using the fastest route option. This would direct me over highways crossing the Hudson River, including the Tappan Zee Bridge (renamed to Governor Mario Cuomo Bridge). While the rain was mostly misting, there were a few brief periods of light rain. The Beeline Moto 2 didn’t skip a beat; the weather sealing, including the open USB-C port on the bottom, had no issues. The screen was still quite visible with the water drops on top, and they seemed to clear quite effectively just from the wind. The bright LED flashing at the top of the unit at a turn was another visual cue to ensure you never miss another turn. On this leg of the trip, I first saw the new numbered route following the turn indication. This was a pleasant surprise as I hadn’t known about that capability.
The route sheets were handed out after signing in at the event start. One of the remarkable things about this event is you don’t know the route or the destination until the morning of the event after you’ve signed in. Fortunately, if you don’t want a paper route sheet, they can load the GPX onto your GPS. While most of the setup is for dedicated GPS units like the Garmin Zumo XT, they can also email you the GPX files. I took this option & within a few seconds, received the files. I was able to download them to the files section of my iPhone. Then, opening the Beeline App, I chose the planned route and then imported GPX, and navigated to the location in the files where I’d put the files. Picking the Saturday files, it loaded into the app, and now I knew my destination lay about 300 miles to the northwest near the Finger Lakes. Our campground was just 13 miles from Hammondsport at the southern tip of Lake Keuka.
I made sure I turned off the automatic reroute since the whole point of the Ramapo 500 was to follow the roads they planned out. Heading back out to the bike and the rain, I mounted the Beeline Moto 2 onto the R18 and began to follow it. This experience was nearly identical to my planned routing to get to Congers. The only exception was that numbered routes didn’t appear to be indicated in the next turn like they were on app-planned routes.
Even the screen, which showed the remaining distance and estimated time, made me smile as I could see how many hours were estimated and even what time I should arrive. While this is common on map-based GPSs like the Garmin Zumo XT, it wasn’t on the original Beeline Moto. With around 8 hours of riding ahead of me, I knew I’d be taking a few breaks along the way, including lunch.
As I started, there was a bit of heavier rain, and my suit became soaked, but with forecast highs in the upper 80s later in the day, I figured this would aid in cooling. Within 30 minutes, I was far enough west to have passed the storm line, and the skies began to clear, and the sun started shining. The waterproofing of the Beeline Moto 2 was tested and seemed to pass with flying colors as it continued to work fine throughout the trip.
While the new Beeline Moto 2 does have automatic backlight control, this is where I first noticed a gripe I have with the new display. I was heading west in the early morning with the rising sun behind me. At times, the screen was thoroughly washed out. However, I could put my hand over the screen, which caused the backlight to switch levels after a few seconds, and then I could see it again. A firmware update could likely improve this rather than be a fundamental hardware flaw.
I used the original Beeline Moto in last year’s Ramapo 500, and the junction improvements in the Moto 2 meant I missed fewer turns than I had with the original. The time remaining was also helpful in determining how I may have had a faster pace at times, and then some breaks brought me back to where I was originally estimated to be.
Some additional challenges of the Beeline Moto 2 were brought into clarity with this year’s Ramapo 500. The Saturday route was phenomenal, bringing wonderful curvy roads with great sights in some of the more rural parts of New Jersey, Pennsylvania, and, of course, New York. The downside is that we were pretty far away from any main roads that would have services.
Fortunately, the route was on the outskirts of Scranton around lunchtime, so I pulled over at a restaurant I saw along the road. That was lucky timing rather than anything planned. With a 300-mile route, it’d be great to be able to look for food or fuel along the way.
I wasn’t as lucky with fuel. While I did refill about 70 miles after the start since I had about 40 miles to get to the beginning from home, I didn’t see many options after that. The BMW R18 Classic, with my heavy throttle hand, typically hits the reserve indicator at about 130 miles on the tank to show one gallon remaining. With an average of about 40 MPG, I plan to refill by 150 miles.
My MPG was up with a bit more sedate pace on the Ramapo 500, but I still wanted to refill at standard points. A Dandy gas station was on the route when I was at about 120 miles, so I pulled over to get gas. The machine wasn’t working and said to see the attendant, so I stupidly decided to press on as I had at least another 50 miles of range to empty. But, mile after mile, there was no gas station in sight. My reserve light went on at about 150 miles and began ticking the miles since it went. I figured about 40 miles to be conservative. But no stations were there. I started easing the throttle to get even more economy as the miles kept clocking upward on the reserve indicator. I even pulled over at one point with 20 miles on the reserve to look for gas stations with a regular map app. But, no service in the rural area meant that option was unavailable.
Finally, as I entered the town of Troy, PA, I saw another Dandy station. This one only had regular gas, while the R18 prefers premium. But, since I was now at 179 miles on the tank, I refilled there as the machine was working. But then, no more than another 2-3 miles down the road were many more stations, each with premium. If the Beeline Moto and app could add waypoints for fuel or food in the middle, or at least search for them, I wouldn’t have been so stressed about getting fuel. Given I record every tank on all my vehicles on Fuelly, the 179 was the most miles I’d done on the R18 Classic in a single tank. With only a 4.2-gallon usable capacity tank, I filled in 3.6 gallons. My conservation efforts paid off as I was able to have an excellent 50MPG and a remaining range of just 30 miles. But it would have been far less nerve-racking if I could search for fuel or even indicate when the next ones were coming on your route. A bonus would be if it used any cell service to grab them ahead of time so it would still be available in points like I was in rural areas with no service.
I was checking the battery level on the Beeline Moto 2, and it was declining quicker than the original Beeline Moto. This is probably due to the more advanced screen and the auto backlight. However, the result was that the screen was switched off with a charge indicator that had less than 20 miles to go. Fortunately, with Beeline Plus, I still had the audio turn-by-turn directions. I debated pulling over and charging the Beeline a bit from a power bank, but I didn’t see a good pull-off spot until the audio announced I’d arrived at my destination. I didn’t turn off the Beeline Moto 2 during stops, even during lunch, so it ran from when I left my house around 7:40 AM to about 5 PM. That’s just over 9 hours, so it’s still short of the claimed 14 hours.
On Day two of the ride, I took the learnings from the first day & looked for gas after about 80 miles on the tank to give me plenty of buffer. When I stopped for lunch, I put the Beeline Moto 2 on my power bank charger to ensure I’d have plenty of juice for the rest of the trip.
Now, a Ramapo 500 is probably an atypical example of a usual ride with the Beeline Moto 2. It was an imported GPX of ~300 miles per day, mostly in rural areas with limited cell service. On day one, I pushed it to the extreme, leaving it on from when I left home till I was to arrive at camp. It very nearly made it. It wouldn’t have been an issue if I did what I did on day two and charged it a bit at lunch. Beeline offers a powered mount option, eliminating the battery capacity concern. But the battery capacity wouldn’t be an issue for most day rides, where people ride for a few hours. Charging it during a break or even turning it off during the break if you weren’t on a GPX import probably would also give you more time.
Conclusion
The Moto 2 has several improvements over the original Moto, making it better than ever. While I still believe the original Moto was and is a great device, it had several compromises that made it less than ideal for some riders, especially the junction functionality. These compromises have been largely addressed in the new model.
Issues that could hold you back
Missing functionality from map-based GPSs
Many people reading this review may be familiar with a map-based motorcycle GPS unit like the Garmin Zumo XT or those in cars. Those generally are standalone devices. You can define the route directly on the device. You could find a nearby station directly on the device if you needed to stop for gas. There is no equivalent capability on the Beeline Moto 2, and as I found on the Ramapo 500, that could have meant running out of gas on the backroad routes I was on. There isn’t even an option in the app to edit the current route by finding a new waypoint and inserting it. So, if you want to add a waypoint for food or gas, you would need to end the current route and then create a new route, finding the stop for the middle. I didn’t want to chance that with a GPX route since it might not have been possible to pick up in the middle of where I was. The beauty of software, though, is this can be addressed in a software update for the app. It could even be smart to offer to find places near your route. A later firmware update could enable finding the nearest gas station on the device through a menu option.
Why not use a phone directly?
This is the most reasonable question. I’ll divide this into two aspects…. Hardware and software.
From a hardware point of view, your phone isn’t designed to sit on a motorcycle handlebar. Vibration, direct sunlight, and the always-on display present many challenges. Plus, most phones aren’t compatible with motorcycle gloves unless you get special gloves to use with them.
The software angle is more challenging to argue against. I love to use Rever to plan my bike trips. That app and others can provide turn-by-turn routing with a display similar to a dedicated map-based GPS like the Garmin Zumo XT. The Beeline company is building a hardware device and a software app to run on your phone. They don’t have all the functionality of some of these other apps on the device. This is a gap that they will need to continue to work to close.
Things like seeing the best roads on the map so you can drag the route to them, like Rever’s Incredible Roads isn’t there. There isn’t currently a POI list by category so that you can find food or fuel stops along the way. You need to know the place’s name before adding it as a waypoint.
If you are trying to reach your destination on the fastest route, there wasn’t any real-time traffic support with re-routing when the Moto 2 was released. However, in late 2024, this was added as a feature for Beeline Plus subscribers. There are no controls or visual indicators it adjusts based on traffic, so it is hard to evaluate how well/if it works. My only indication was it was listed in the release notes. There is nothing in the help docs yet, so even if it is present, the user experience for traffic can be improved.
However, the beauty of software is that it can be changed without buying new hardware. With Beeline Plus subscriptions helping provide a revenue source to keep software development going, I expect new capabilities will continue to be added.
It is still my favorite motorcycle GPS
In spite of the fuel/food search along route limitations I’d mentioned and the reduced battery capacity compared to the original Beeline Moto, I still find the Beeline Moto 2 my favorite GPS device for motorcycles. Its small size keeps it discreet on any bike, not distracting from its aesthetics. The portable mount makes it viable to take with you on fly-and-ride or test rides. For off-road rides where you are using tracks and need to see topography, the Garmin Zumo XT is a great option, but for road riding, I love the Beeline Moto 2.
Now I’ll have to find some new owners for my prior plastic & metal original Beeline Moto, as the new Beeline Moto 2 is a keeper.

Niels Meersschaert
Podcast Host / Writer
Niels fell in love with coffee, traveling to Europe with his parents as a kid. He’s been an avid motorcyclist for over 25 years, owning bikes from nearly every motorcycle segment. He completed a Backcountry Discovery Route solo in 2023 aboard his 2012 BMW R1200GSA, camping along the way. He’s an avid moto camper even when he’s not riding a BDR and always brings tools to brew coffee at the campsite.

Essential Tips for Motorcycle Hearing Protection